How to add web push notifications to your website
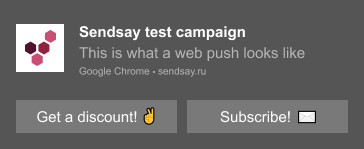
Web push notifications are short pop-up messages from a website that subscribers receive in the browser or on the desktop even if the website is closed.
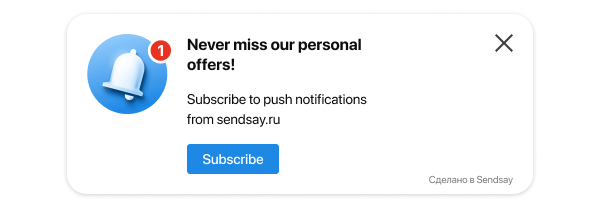
Site visitors can subscribe to your notifications in a signup widget:
When a site visitor clicks Sign up, the browser signup form opens in the browser. To receive notifications from your site, the visitor has to click Allow:
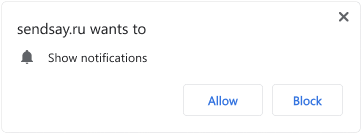
This second form enables the subscription but usually browsers hide it or don't show it at all because of the settings. The widget cannot be hidden, so it helps your base of push subscribers grow faster.
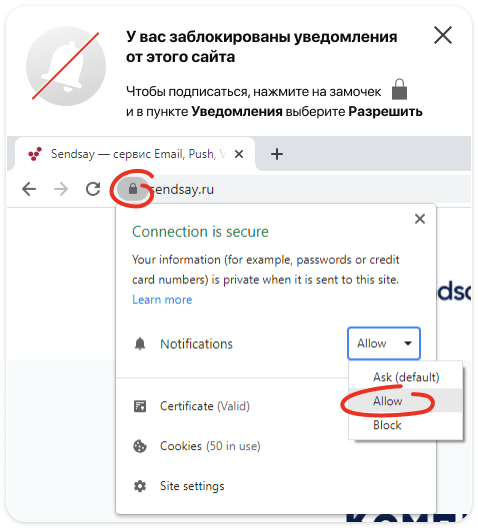
Besides, the widget suggests subscription even to the visitors who have already blocked your notifications. Once a visitor allows them, the widget helps unblock them with additional notification (widget design may be different in various browsers):
Setup
How to connect a new site
- Navigate to Subscribers → Web Push and click Add site. In the New Web Push subscription dialog, enter your site address and then click Add.
To send push notifications, your site must have a valid SSL security certificate. It means that the site address should start with https, not http.
- In the Installation and settings tab, copy the code and insert it into the pages where you want to offer a subscription.
- Download the sendsay_push_sw.js file and place it into the root directory of your site. The file should be available at
https://your.site/sendsay_push_sw.js
How to add a widget to your website
::: Note This step is necessary only if your site was connected before December 24, 2020 :::
To add the widget, update the code that was installed on your website during connection to Sendsay. It won’t impact communication with your customers: scheduled campaigns will be sent on time, and all subscribers will remain in the database.
Following steps depend on the interface you use (legacy or the new one).
- In the new interface
- In the legacy interface
- Navigate to the Subscribers → Web Push, open the website and go to the Installation and settings tab.
- Copy the code and insert it into the pages where you want to offer a subscription (instead of the current code).
In this case, connect the website to Sendsay in the new interface to get the new code:
- Open the new interface.
- Navigate to the Subscribers → Web Push and click Add site. In the New Web Push subscription dialog, enter your site address and then click Add.
- Copy the code and insert it into the page where you want to offer a subscription (instead of the current code).
After the update, you can continue working with push notifications in the legacy interface, although most of the push settings are unavailable there. If you want to start working in the new interface, send campaigns to the All push segment, because it combines subscribers from both interfaces.
Advanced Settings
Signup widget
To configure the widget, navigate to Subscribers ��→ Web Push, click on the site address and open the Signup widget tab. You can edit the following widget settings:
- text and design (i. e. heading, text, button text and color, icon)
- behavior (i. e. when the site visitors see the widget)
- display frequency (how often one visitor will see the widget)
Show signup form on click
Browser signup form can also be opened on click of any element on the page. For this, place an attribute data-sendsay-webpush-subscribe to the tag of the corresponding element.
Web push settings
A push campaign has three settings that you can configure in the Installation and settings tab or when you create the campaign.
Time to live
Web push notifications are delivered when subscribers are online. Time to live is a time span while the system is waiting for unavailable subscribers to connect (12 hours by default).
When setting the delivery period, consider the time after which the web push notification will no longer be relevant. Do not set large values if the notification is time-related. For example, your subscribers won't be happy to receive a notification about the completed webinar or invalid promo code. If the notification doesn't have a time frame, and, for example, you want to inform users about the new material on your site, set a longer period to reach as many visitors as possible.
Web push behaviour
There are two options:
- show notification for a set time interval (8-20 seconds in various browsers)
- show notification until the user closes it (default option)
Icon
We recommend you to set up the icon right away so that subscribers see who sent the notification. If you don't upload any image, the Sendsay logo will remain in the notifications.