How to create a web push campaign
A web push notification is a message sent from the site to the visitors who have agreed to receive campaigns.
To get started, go to Campaigns → Drafts and click Create campaign. In the Select campaign type dialog select Web Push.
Then follow four steps to prepare the campaign:
1. Select recipients
You can send notifications to subscribers from one website.
2. Design the notification
When you create your push campaign, keep in mind that all browsers and operating systems display push notifications differently. For example, character limit along with the amount of images and buttons may vary, depending on the user device. In the preview mode, you can check how your campaign will appear in Chrome and Firefox browsers for Windows, macOS and Android users.
A web push notification consists of the following elements:
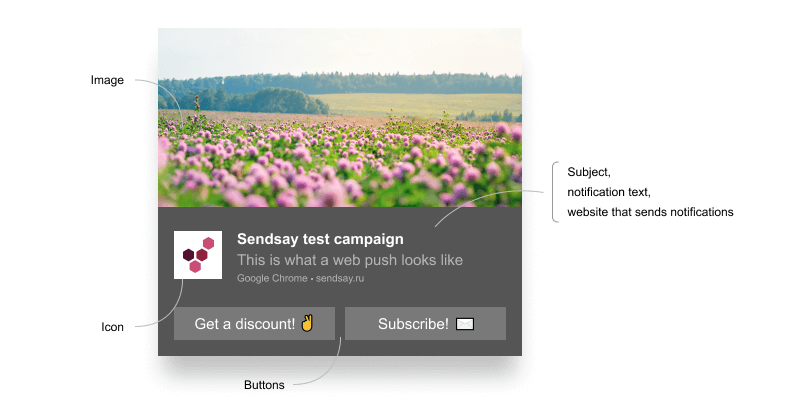
Subject and text. Personalization in web push notifications works only for the subscribers who provided personal data through other channels (for example, filled in name and last name while subscribing to your email campaign). Data from different channels is joined together only when the subscriber is engaged via both channels.
Icon shows subscribers who sent web push notifications. If you don't upload your image, the Sendsay logo will be displayed. You can upload the icon when you create the notification or in the website settings; to do this, go to Subscribers → Web Push, open the website page and go to the Installation and settings tab.
A link to the website that opens after a click on the notification.
Image (optional). Images are displayed only in the following browsers and operating systems:
- Google Chrome on Windows and Android
- Mozilla Firefox on Windows
- Edge
Push notifications can contain only horizontal images. If you upload a vertical image, its central part will remain while the top and bottom will be cropped.

Buttons (optional). You can add one or two buttons to open links or close notification.
3. Configure extra settings (optional)
Delivery settings
Delivery settings have two parameters: time to live and web push behaviour. Both parameters can be configured in the website settings, so you don’t have to customize them each time when you create a campaign. To do this, go to Subscribers → Web Push, open the website page and go to the Installation and settings tab.
Time to live
Web push notifications are delivered when subscribers are online. Time to live is a time span while the system is waiting for unavailable subscribers to connect (12 hours by default). When setting the delivery period, consider the time after which the web push notification will no longer be relevant. Do not set large values if the notification is time-related. For example, your subscribers will hardly be happy to receive a notification about the completed webinar or invalid promo code. If the notification doesn't have a time frame, and, for example, you want to inform users about the new article on your site, set a longer period to reach as many visitors as possible.
Web push behaviour
There are two options:
- show notification for a set time interval (8-20 seconds in various browsers)
- show notification until the user closes it (default option)
Enable Google Analytics and Yandex.Metriсa for link tracking
Use UTM codes that help you analyze subscriber behavior, click map and campaign efficiency in Google Analytics and Yandex.Metriсa.
You can also track the delivery, open rate, unique clicks and other metrics for each campaign under Reports → Regular campaigns.
Add custom parameters
Transferring additional data is necessary to personalize web pages for your subscribers.
4. Select a delivery type
There are four ways to send a push campaign:
Immediate delivery.
Scheduled campaign. Scheduled campaigns are stored in the Scheduled folder where you can edit them before delivery.
Send time optimization. The email is sent to each subscriber at the time when they are most likely to engage (it is determined by an algorithm). This type of delivery works after a month of active email campaigns, because it needs to collect some statistics on opens first.
To enable the optimization function, contact us in the chat
Gradual send. The campaign is sent in batches at equal intervals. This helps to warm up the sender domain for a new IP address or to distribute the load on the call center.
Campaigns are automatically checked before delivery and may be transferred to human moderation. The first several campaigns sent from your account always undergo human moderation. You can track the delivery status in the Task journal.